How to create a GIF: Five easy step-by-step methods
Ever saw one of those cute little moving photos that just seems to capture the expressions perfectly? Those, my friend, are GIFs and they are so fun to create and use! Whether you’re trying to relate to the grandkids, become a GIF connoisseur, or just want to learn a new skill, we will give you the inside scoop on how to create a GIF for those moments that words alone cannot express.
What is a GIF and how do I use it?
GIF stands for Graphics Interchange Format, which just means that it is a certain image format that supports animated and static images. It allows for a compression of images that is easily shareable. A GIF is an animated image that plays on a continuous loop, and it does not have sound. Once a GIF is sent, it loads immediately. This sets it apart from a video, because with videos you must press the play button. You can save all your GIFs in the free cloud storage with the mail.com free email account. You won’t have to use all the space on your device.
Have you ever been commenting on something, writing in the family group chat, or describing your crazy day to a friend but words just don’t seem to express the intensity of your emotions? This is where GIFs come in handy. They’re literally just animated images. Many people use them because there seems to be one for every scenario, emotion, and comedic moment.
How can I create a GIF animation?
Creating a GIF animation is not as hard as you might think; in fact, it is quite user friendly. (Hmm reminds me of our free email accounts: they’re also quite user friendly.)There are many ways you can make super-awesome GIFs and GIF memes:
- From a video
- From photos
- Using Photoshop
- On an iPhone
- Online
- With an app
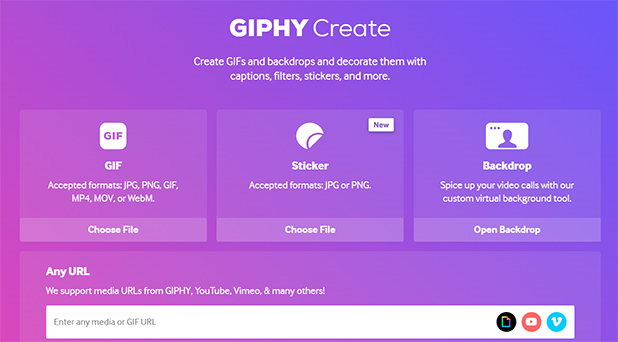
Create a GIF online with GIPHY
Making a GIF online is literally as easy as 1,2,3... 4 and 5. For example, you can go online to the GIPHY webpage, where you have to create an account. If you do not have an account, you cannot make GIFs with GIPHY, but you can easily adjust your settings to make your GIF masterpieces private, meaning the public cannot see them. When creating a new account, remember to make sure you have a secure password. ;-)Once you have set up your GIPHY account, you can upload files to turn into GIFs and add captions, stickers, filters, and drawings to it.
- Log into your GIPHY account
- Click “Create” next to your profile
- Click “Create GIF”
- Choose photo or video files for your GIF
- Customize your creation as you wish! Add a caption, choose fonts, colors, stickers, filters, or even draw on it. Really make it the way you want.
- After editing your GIF, then select “Upload”
- You can choose whether the GIF is public or private, and select “Upload”
- Save your GIF to your computer. Start by right-clicking on the thumbnail and selecting “Save as,” you can then alter the GIF name which it will be saved as
Create a GIF on your iPhone
Even when sitting at the family dinner, you can make a GIF in literally a couple of seconds. You can create a new GIF simply by taking a photo. Creating a GIF on an iPhone lets you create one in real time and have it ready immediately in your photo gallery.- Open your camera app
- Tap on the circle in the top right-hand corner (this will now turn your photos into LIVE photos)
- Take a LIVE photo of the GIF-worthy person, place, occurrence, etc.
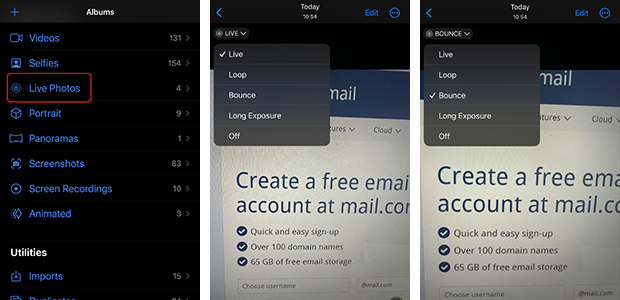
- Open the Photos app and tap “Albums”
- Scroll down to “Media Types” and tap on “Live Photos”
- Choose the live photo you want to turn into a GIF
- In the left-hand corner, tap on “Live” (this will bring a drop-down menu with options”
- Select “Bounce”
Create a GIF in Photoshop
It is a bit fancy to use photoshop for creating a GIF. It is more advanced, but we want you to know all of your options. These steps may differ depending on your version of Adobe:- Open Adobe Photoshop
- Go to File > Import > Video Frames to Layers
- Trim the part of the video you want in the GIF
- Make sure to check the “Make frame animation” box and click “OK2
- Lastly, go to File > Export > Save for Web
“Can I create a GIF from video too?!?” – says the reader
Bet you didn’t know you could create a GIF or even a saucy GIF meme from a video. Wouldn’t that be fun? Can you imagine a video that makes you laugh so hard that you cry? I bet it’s hilarious. Now, just imagine you could turn that video into a small image that you can send basically instantly, and it will play in a loop. Don’t think it can be done? Well, my friend, there is so much to tell you. Creating a GIF animation from a video is simple:- Log into your GIPHY account
- Select “Create” in the top right-hand corner
- Select “GIF” and you will be prompted to choose a file that you want to make into a GIF or a GIF meme
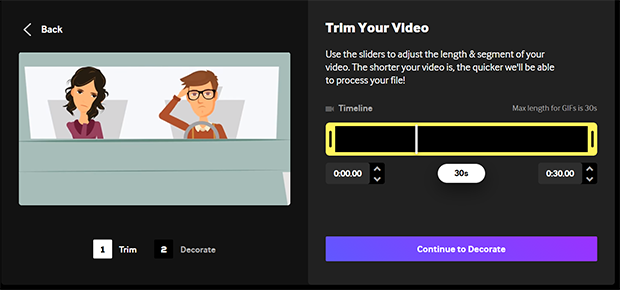
- Once the video is uploaded, you then can trim any parts of the video you do not want in the GIF
- If you’ve got it just like you want it, select “Continue to upload”
- You can add tags if you want to let your GIF be visible to the public by category or “tags.” You also have the option to make your GIF completely private and for your eyes only.
- Now your GIF is ready to be downloaded and sent around to everyone! Simply right click the GIF thumbnail and select “Save as.”
Create a GIF from a YouTube video
Didn’t know you could make a GIF out of a YouTube video? Well, you can! The video clip just has to be under 10 minutes in length.- Go to YouTube and select the video you would like to make into a GIF
- Copy the video URL
- Go to GIPHY (make sure you are logged in) and select “create”
- Paste the URL into the URL box in the middle
- Trim off the parts of the video you do not want in the GIF (the maximum length for a GIF is 30 seconds)
- Decorate your new GIF as you wish with captions, stickers, filters, and drawings.
- After editing your GIF, then select “upload”
- You can choose whether the GIF is public or private, and select “Upload”
- To save your GIF to your computer all you have to do is right click on the GIF thumbnail and select “Save as.” This will automatically save your masterpiece as a GIF.
Let’s create a GIF meme
Are you a comedian, but your family and friends just don’t know it yet? It’s okay, you will be able to showcase how funny you are soon enough. Many famous GIFs are from famous scenes or just the sheer silliness of pop culture. If you want to be the GIF meme master, just make sure your GIFs are relatable, current, and funny.I am not creative, but I still want to send GIFs
Not an artiste of sorts? It is okay, there is the option to simply download GIFs that already express what you’re trying to convey. The most popular GIF-making website GIFHY estimates 1 billion memes are sent each day. With this in mind, there is no pressure on you to be the next Van Gogh of perfect GIF curation. I pride myself on my vast GIF collection because I am also not very creative. But now you know where you can download some of the best GIFs out there!There are many reasons to create a GIF: they’re easy to make, they allow you to showcase some personality, and you can entertain whomever you are sending the GIF to.
We would love to hear from you. Please feel free to leave your feedback below!
Images: 1&1
119 people found this article helpful.
Related articles