How to scan documents with iPhone camera, iPhone Notes & email app

Since factors like lighting, other objects nearby, and getting the right angle make it hard to take a usable photo of a document, you may have thought about looking for a free scanner app for your iPhone. What many people don’t realize that since iOS 11, their iPhone includes a built-in document scanner.
And for those of you who use the mail.com Mail App for iOS – which of course we highly recommend! – you can use it to scan documents and immediately send them as email attachments, store them in your mail.com Cloud, or save them to your device’s hard drive.
How to scan a document with an iPhone:
- Scan with the mail.com Mail Cloud
- Scan an attachment for your mail.com email
- Scan with Notes app
- Scan with File app
Scan a document on an iPhone in your mail.com Cloud
With the mail.com Mail App on your iPhone, you have the tool you need to scan documents in a few taps and save them right in your mail.com Cloud – where they won’t take up space on your phone and are automatically available on any device where you access your mail.com account.Follow these easy steps to create a scan in the mail.com Mail App:
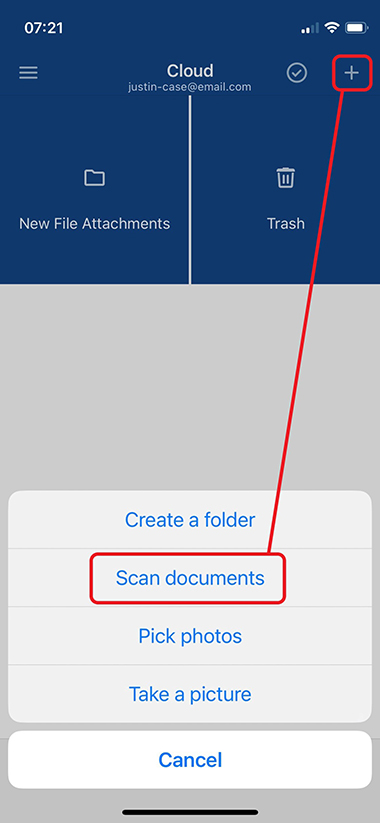
- Open the mail.com app and tap the Cloud tab
- Tap the + symbol in the upper right corner
- Select Scan documents
- Your phone’s camera will open
- Position the document you want to scan in the viewfinder
- The app will automatically detect the document and define the area to scan
- Press the button in the bottom center of the screen to take the scan, or wait a moment for the scan will start automatically
- If you would like to scan another page, repeat steps 5 - 7
- Once you have scanned all your pages, tap Save
- Enter a name for your document and press OK
- Your scanned document is now saved as a PDF your mail.com Cloud
Scan a document to send as an email attachment
If you’d like to scan a document to send as an email attachment, in our Mail App you can create a scan directly from your email:- Open the mail.com app and tap the Mail tab
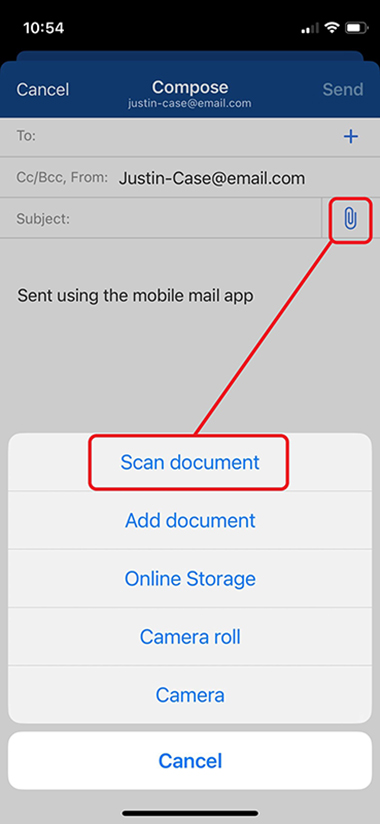
- Compose an email message as usual
- Tap the paperclip attachment symbol to the right of the Subject line
- Select Scan documents
- The camera on your phone will open
- Position the document in the viewfinder
- The app will automatically detect the document and scan it
- If you would like to scan another page, repeat steps 6 - 7
- When you are done scanning, tap Save
- Your scan will automatically appear as a PDF attachment to your email.
If you don’t have the mail.com Mail App installed on your iPhone yet, follow this link to get started with our iOS email and cloud app.
How to scan using iPhone with Notes app
If you want to scan a document with your iPhone, there is no need to look for a separate free scanner app. Although the iPhone scanner function is hidden in Apple’s Notes app, it has been a standard feature for several years now.Here’s how it works:
- Open the Notes app on your iPhone
- Create a new note by tapping the note icon in the lower right corner
- A menu will appear above a screen keyboard. Tap the camera icon on this menu
- Select Scan Documents
- The iPhone Camera app will open
- Position the document you want to scan in the phone’s viewfinder
- The app should detect the document and capture the scan automatically. However, if it is in manual mode, you may have to press the button to activate the scan. You can toggle between Auto and Manual mode in the upper right corner of the screen.
- You can drag the corners of the page to adjust the scan if necessary
- If you are not happy with the scan, tap Retake. If you would like to scan additional pages, repeat steps 6 and 7.
- When you have scanned all your pages and are satisfied with your scan, tap Save
- Tap Done and your scan will be saved in the Note app, where you will be able to locate it later
- Tap the share icon to send the scan to someone else, print it, or save it to your File app
How to scan documents using the iPhone Files app
With iOS 13, an option to scan documents was also added to the iPhone Files app. This can be useful if you intend to store the scanned document in a file here.The scan process is similar to the once used in the Notes app:
- Open the Files app on your iPhone
- Tap the three-dot menu button in the upper right of the screen
- Select Scan Documents from the menu
- Your iPhone Camera app will open
- Position the document in the camera’s viewfinder
- The camera will automatically detect the document and scan it
- If you are scanning a multi-page document, repeat steps 5 and 6 until all pages are scanned
- Tap Save
- Tap the folder where you would like to save the scan (or, to create a new folder, tap the three-dot menu and select New Folder)
- Tap Save. Your scan will be saved as a PDF in the folder you selected.
- If you would like to print the scanned document or send it to someone, tap the document icon and then the share icon in the lower left of the screen.
FAQ: Scanning documents on your iPhone
- How do I email a scanned document on my iPhone?
If you have scanned the document in the Apple Notes or File app or the mail.com Cloud, open that app, locate the document, and tap on it. Then tap the share icon (square with an arrow pointing up) and select your email app (Apple Mail, mail.com, etc.). The email app should open with your scanned document already attached to an email draft – now you just have to write, address, and send the email as usual. Alternatively, in the mail.com app, you can create a new scanned attachment in the Compose Email window by tapping the paper-clip icon, selecting "Scan documents," and following the instructions above.
- How do I scan an image on an iPhone?
The process for scanning an image on your iPhone is no different than scanning any other type of document – open the Apple Notes or File app or the mail.com Cloud and use the "Scan Documents" option as described above.
- Can I take a picture of a document instead of scanning it?
You can always use your iPhone’s Camera app to take a photo of a document instead of scanning it. However, using the scan function usually produces a more legible result, plus the document scan will automatically be cropped to the correct size and saved as a PDF.
- Where can I find scanned documents on my iPhone?
The scanned document will be stored in the app you used to create it. So, if you scanned the document in your mail.com Cloud, you’ll find the scan there in your online storage. If you used the Notes or File app, the scan will be saved there.
- How do I upload a scanned document from my iPhone?
Tap on the scanned document and then on the share icon (square with an arrow pointing up). Then tap the app you would like to use to upload the document, e.g., iCloud, Google Drive, or mail.com Cloud, and follow the prompts to upload your scan.
- Does the iPhone camera have a scan option?
When you open the iPhone Camera app directly, it does not offer a scan option within the app. However, when you scan a document with an iPhone app like the mail.com Mail App or Apple Notes, it utilizes the phone’s camera to create the scan.
- How do I scan a document on my phone and make it a PDF?
When you scan a document on your iPhone (e.g., using the mail.com Mail App or the Apple Notes app), it is automatically saved as a PDF file.
Now you have four methods at your fingertips to scan documents with your iPhone at any time. Before you get started, please give us some feedback below!
And if you still don’t have a mail.com account, sign up for free today!
This article first appeared on Sept. 26, 2022, and was updated on November 15, 2024.
Images: 1&1/GettyImages
302 people found this article helpful.
Related articles