How to compose an email with mail.com: Discover your options
Compose options for email
First, let’s take a look at the Compose E-mail window: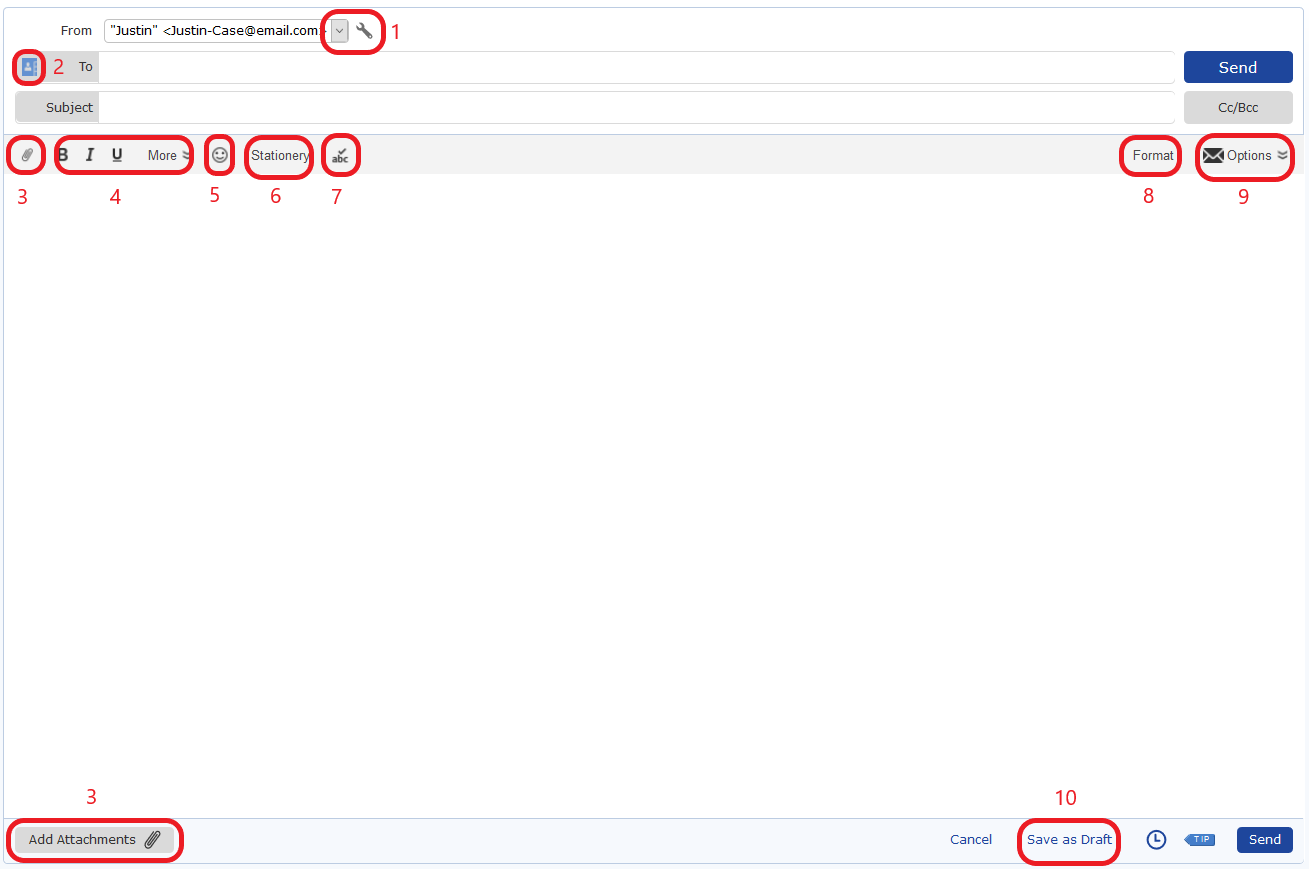
Here are ten functions you may find useful the next time you write an email:
- Change your sender address: If you click the downward arrow to the right of the sender name, a dropdown menu will appear with all of your alias addresses for this email account. Click on the sender address you would like to use for this email and it will appear in the From field. If you would like to edit or manage your sender addresses, click on the wrench symbol.
- Select a recipient: Click the address book symbol to select an email address from your Contacts. A list of recently used addresses will appear. If the address you want is not there, start typing the recipient’s name in the Search Contacts field. Once the name you are looking for appears, click to add it to the Send field. . If you are writing to a new contact and no address is suggested, simply type the entire email address in the To field. To send a copy or a blind copy to additional recipients, click the Cc/Bcc button to the left of the To field and follow the same process to add email addresses in the desired field
- Add an attachment: You can click the paperclip symbol in the upper left or the Add Attachments button in the lower left of your screen to add an attachment to this email. Clicking either place will give you the option of selecting a file from your Cloud or your device’s hard drive. You can send multiple attachments as long as their total size does not exceed 30 MB (or 100 MB for Premium accounts).
- Change your font and add hyperlinks and images: The bold, underline and italic font functions are on the main menu bar. For additional ways to change the appearance of your text, click More. This opens another menu where you can change the font style and size. There are more formatting options here that you may be familiar with from word processing programs, such as adding number and bullet lists, changing your font color and adding hyperlinks.
- Emojis: Click here to add a wide range of smileys and symbols to your email. There are 14 different sets of emojis in different styles and sizes – everything you need to express yourself and make sure you get your message across!
- Stationery: To give your email an extra-festive appearance, click here to add special backgrounds and formats. Send some birthday balloons or spring flowers to a loved one, or a last-minute customized holiday card with a photo.
- Spellcheck: Put an end to embarrassing typos in your email! Click this button and any spelling errors will be underlined in red. Right-click on the underlined word for suggested corrections, then replace the misspelled word by clicking on the correct spelling.
- HTML vs. plain text: This option determines whether your message can contain special formatting, images, emojis, etc. All of these are possible in HTML, whereas plain text is exactly what it sounds like – just your words, exactly as you type them. Why use plain text? Depending on their email provider, some recipients may not be able to see your HTML formatting, whereas a plain text email will always arrive looking exactly like you sent it.
- Priority options: Click here to mark your message as high, normal or low priority (normal is the default). This is also where you can mark your message as confidential or, if you are a Premium user, request a read receipt.
- Save your draft: Say you are not ready to send your message – you need more time to finish it or you want to read over it later with fresh eyes before sending it. Clicking this button will save your message to your Drafts folder, where you can return to it later and send it whenever you’re ready.
Pro tip: Writing an effective email
Subject line: Make sure that your subject line is brief and to the point. A vague subject line – like “Meeting” or “Quick question” – may cause your email to be overlooked. Be specific, e.g. “Important follow-up to Aug. 8 meeting”. Always include a subject line. Not only does it tell your recipient what to expect, but a missing subject line may cause your email to be marked as spam.
Salutation: In a business email, you can’t go wrong by starting your email with “Dear [Name],” whereas an informal email can start with “Hi [Name]” or just “Hi”. For more tips on formal and informal salutations and opening lines, see our post on email greetings.
Body: Start by briefly introducing the reason that you’re writing, then give the details in the body of your email. Respect your recipient’s time by writing your most important points first and keeping your message clear and brief. This means not longer than one screen length on your laptop. Breaking up your text into short paragraphs makes it easier to read. For more information, see our deep-dive into business email etiquette.
Closing words: It’s considered good style close an email with some appreciation – “Thanks for your help / time /etc.” Then add a closing that matches your salutation – “Sincerely” or “Kind regards” for a formal message, “Take care” or “Cheers” for an informal email. If you addressed the recipient by their first name, sign off with your first name as well, but use your first and last name if you addressed them with Mr/Ms. For more about email closings, see best closing lines
This post originally appeared on July 22, 2021 and was updated on Sept. 1, 2022.
Images: 1&1/Shutterstock
383 people found this article helpful.
Related articles